Small animal training eye (Ver 1, small fundus)
| training_eye_small_animal__ver1__instructions.docx.pdf | |
| File Size: | 823 kb |
| File Type: | |
|
|
|
| ||||||||||||||||||||||||
The training eye can be used in three different configurations for practising examination and photo-documentation of specific parts of the eye. This version is designed to mimic imaging and examination of the peripheral fundus.
Checklist
- Eye model body
- Simple lid – for anterior segment configuration
- Painted slide (the cornea simulacrum)
- 1 x clear 30mm diameter planoconvex lens (to mimic the anterior chamber)
- 1x 30mm diam planoconvex lens with lesions painted on (to mimic the crystalline lens)
- Paper iris models with pupil cut out
- Pen torch & slit beam adapter.
- Macro lens (for phone)
- 20 dioptre lens for practicing indirect ophthalmoscopy.
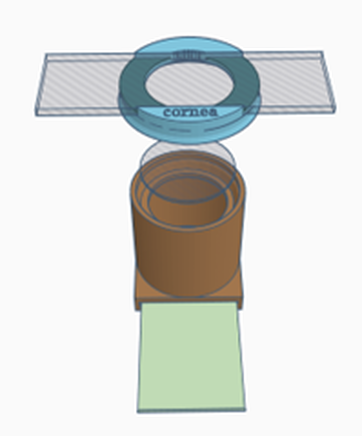
Configuration 1: Cornea
- Place a retinal image into the slot at the bottom of the model body- this is important to allow a fundic reflection. Experiment with different fundi to see the effect on the fundic reflection
- Place the clear 30mm planoconvex lens in the top of the model body – this will provide a more normal fundic reflection – try removing it and see what it does to the fundic reflection.
- Place the slide carrying lid (labelled cornea)
- Place the corneal simulacrum (the painted microscope slide) in the carrier NB the slide is painted on both sides to represent:
- Anterior surface
- Superficial corneal vascularisation – an opacity .
- Corneal foreign body – an opacity.
- Superficial corneal ulcer – a refractive change
- Anterior punctate opacities (on the ground glass) – subtle opacity.
- Posterior surface
- Keratic precipitates - opacities
- Deep corneal vascularisation - opacities
- Deep stromal abscess – an opacity
- Linear keratopathy lesions – a refractive change
- Anterior surface
Distant direct Ophthalmoscopy – in this arm’s length technique we are looking for opacities in the visual axis – we observe light from the defocused fundic reflection which will cast shadows when opacities are present in the viewing axis. With your phone use digital zoom to fill the screen with the pupil. Note that this will highlight focal refractive changes in the “cornea”, thus superficial ulcers, poor tear film and linear keratopathy lesions are best seen with this technique. Note how their “opacity” will change with incident light levels whilst true opacities (e.g. the corneal foreign body) will remain dark however low your incident light is.
Close direct ophthalmoscopy – in this technique we get closer to the model and use both light reflected from the fundus and incident light from the ophthalmoscope or phone. Opacities will now look their “natural” colour although you may see some shadowing at edge of the lesion. Key to this technique is that we are now focussing on the lesion using either using:
- the positive dioptre lenses in our ophthalmoscopes (chose higher positive lenses to get closer and see a larger image)
- focusing the phone camera at its minimum focal distance (or the “macro” setting.)
- focussing on lesions at different depths – the eyelids, the grey line, anterior cornea and the posterior cornea.
- Using a modelling light (pen torch, head torch etc) practice imaging the lesions with
- Oblique direct lighting – this will show you the lesions true colour and will allow the best quality image as the lighting should allow the lowest ISO setting and a fast shutter speed
- Oblique indirect lighting – aim the light towards the fundus and adjust angle until the reflected light retro illuminates the corneal lesion. This will allow you to assess the structure and optical density of the lesion
- Using the slit beam adaptor on your pen torch or the slit on your direct ophthalmoscope to obliquely illuminate the cornea. Try and identify the anterior and the posterior corneal surfaces (this is how a slit lamp works). Note this is easiest on the ground glass end.
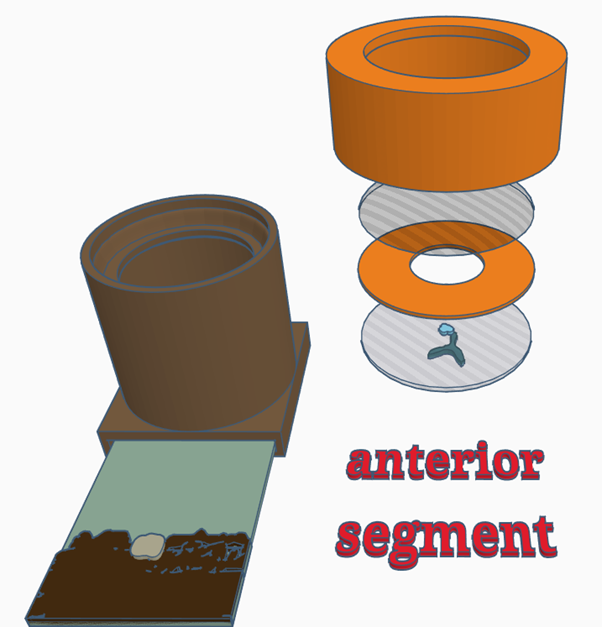
Configuration 2: Anterior segment (cornea, iris, anterior chamber & lens)
- Place a retinal image in the slot at the bottom of the model
- Place the lens simulacrum (the half lens with painted cataract lesions) in the top of the model, this simulates the crystalline lens. The lens simulacrum has an:
- anterior axial round opacity and
- posterior axial Y shaped opacity
- Place a paper iris on top of this – try different pupil sizes and look for the effect this has when using parallax to localise lens lesions, with a small pupil posterior lesions can be made to disappear behind the iris
- Place the anterior chamber simulacrum (clear half lens) on top of the iris this will simulate the anterior chamber
- Place lid
- NB you can swap the lenses around so that the opacities are anterior to the iris – the posterior “cataract” will then become a corneal opacity – see how this affects your distant direct ophthalmoscopy view and use parallax to demonstrate it is now anterior to the pupil
Distant direct Ophthalmoscopy – in this arm’s length technique we are looking for opacities in the visual axis – we observe light from the defocused fundic reflection which will cast shadows when opacities are present in the viewing axis. With your phone use digital zoom to fill the screen with the pupil.
Using parallax to localise lesions. Use distant direct ophthalmoscopy with your phone and or ophthalmoscope to identify shadows in the visual axis. Now move your angle of view (or the model) and see how the opacities move. You will see that opacities at the level of the pupil always remain in the middle of the pupil whilst opacities in front of or behind the pupil will move and do so in different directions.
Close direct ophthalmoscopy – in this technique we get closer to the model and use both light reflected from the fundus and incident light from the ophthalmoscope or phone. Opacities will now look their “natural” colour although you may see some shadowing at the edge of the lesion. Key to this technique is that we are now focussing on the lesion using either the positive dioptre lenses in our ophthalmoscopes or by focussing the phone camera at its minimum focal distance (the “macro” setting.)
Macrophotography – using a macro lens attachment on your phone to practise.
- focusing on lesions at different depths – the lids, cornea, the grey line, iris, anterior lens – can you get close enough to focus on the posterior lens lesion? Note you will need to steady your phone against the model to allow the fine micromovements required to focus accurately.
- Using a modelling light (pen torch, head torch etc) practice imaging the anterior lens lesion with
- Oblique direct lighting
- Oblique indirect lighting – aim the light towards the fundus and adjust angle until the reflected light retro illuminates the lens lesion.
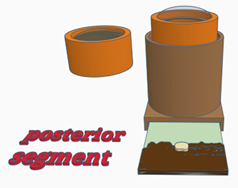
Configuration 3: Posterior segment
- Place a retinal image into the slot at the bottom of the model body—note the target words on the image
- Place the lid containing a lens (labelled cornea & fundus). This lens focuses on the fundus mimicking the cornea and crystalline lens in the normal eye.
- Note you can add irises on top of the lens to help practice working through different pupil sizes.
Close direct fundoscopy- Use your direct ophthalmoscope focussed on optical infinity (look through eye piece at a straight line >6metres away and rotate the lens carousel until the line is focussed. This should be 0 if your eyes have no refractive errors (emmetropia). Use your phone camera in “torch mode” (light on continuously) and focussed at infinity ((set manually or tap to focus at an object far from you). With either phone or ophthalmoscope, move closer to the model until you can see the fundus, try to read or photo document the target words. Note you will need to change your viewing angle to see peripheral target words.
Indirect ophthalmoscopy. In low light, using a light source as close to your visual axis as possible (e.g. hold pen torch at your lateral canthus) or your phone in torch mode to image the fundic reflection. Now position the lens 1-2” in front of the model, ensuring it is in line with the middle of the pupil and parallel to the axial cornea. Adjust the lens position until a retinal image. Using small movements move the lens backwards and forwards, note how the image changes. Aim to have the fundic image fill the screen with no other structure visible (if you can see an upright iris you are too close, if you can see an upside down iris you are too far away). Using your phone’s digital zoom fill your screen with the fundic image before capture. Using video can make this much easier.


